The squat rack is the core of any serious home gym, and choosing one can feel incredibly complex. It’s the single piece of equipment that unlocks the safest and most effective barbell training, but the terminology is a minefield—power racks, half racks, spotters, J-Cups, steel gauge… how do you make sense of it all to choose a squat rack?
The truth is, for the vast majority of us, the ideal setup is simpler than you think. This guide will help you focus on the fundamentals: Safety, Space, and Customizability.
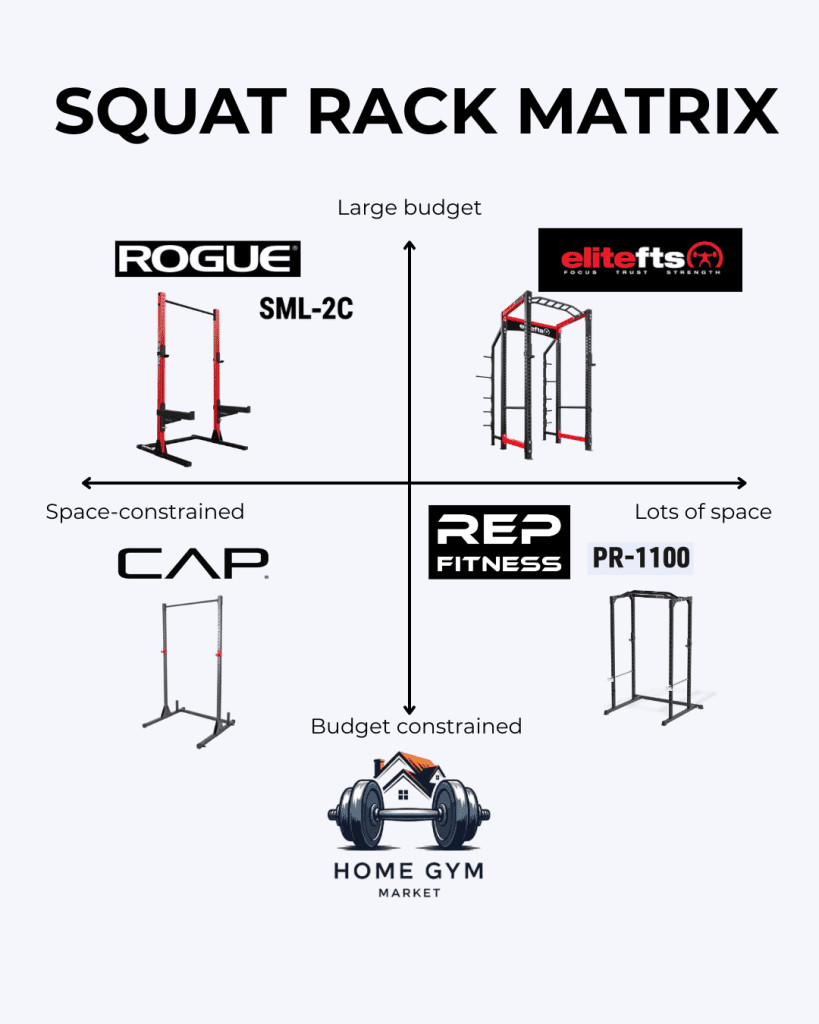
Most guides will push a long list of technical features at you that you don’t understand. We’ll explain those features, but this guide is different. We believe your decision should be driven by your reality: the space you have and the budget you’re working with. That’s why our final recommendations are structured around solving for those two constraints first.
You can see them below. Ultimately, you want to figure out in which quadrant you sit. The below is an example of the thinking, before we analyze racks in depth.
The Main Types of Racks (Explained Simply)
Racks come in three basic shapes: a cage (four connected uprights); a half rack (two connected uprights); and stands (two detached uprights). A “power” rack USUALLY refers to a cage, but more by habit than by intrinsic meaning. Each structure can be somewhat customized and have their own sub-variants, but these are the basics.
I’m not going to pretend they’re all equally valid: your starting position should be to buy a CAGE, and you would only consider a half rack or squat stands if you’re facing significant space and/or budget constraints. Still, even if it’s a cage, how do you choose a squat rack?
What Actually Matters for Your First Rack?
Once you’ve decided on the type of rack, you need to judge its quality. The good news is you only need to look at a few key features to know if a rack is solid or something you should avoid when it’s time to choose your squat rack. Let’s break them down.
Stability: Frame Construction & Steel Gauge
The stability of a rack comes from its structure. A cage is connected at the floor by steel beams on the sides and usually the back, giving it immense stability. A half rack is usually only connected at the back. Squat stands aren’t connected at all. The more the steel is attached, a more stable the rack. Simple as that.
Steel gauge refers to thickness, and yes, a lower number is thicker. Reputable vendors use either 14-gauge (2mm) or 11-gauge (3mm). 11-gauge is the standard for commercial gyms designed to withstand constant, heavy use by hundreds of athletes. For a home gym, 14-gauge is absolutely fine and will handle any weight you can throw at it.
Now, the following opinion breaks with the conventional wisdom from affiliate marketers: 14-gauge is absolutely fine for you. Check out this video of a powerlifter squatting 730lbs on a rack built with 14-gauge steel. If you’re reading this guide, you don’t squat 700lbs, and you will likely never get close. You are never going to exceed the weight capacity limit of a quality cage built with 14-gauge steel, so it’s a perfectly safe choice for a squat rack.
My personal experience? I’ve always gone the 14-gauge route for my own cages, though I’ve found other formulations tempting. My biggest mistake was that once I bought a rack from a seemingly reputable brand that did NOT specify the steel gauge. Imagine my surprise and disappointment when I discovered it was 16-gauge. Sixteen-gauge, folks, is unreliable trash. If the steel gauge isn’t clearly listed, it’s a hard pass. It must be at least 14-gauge.
Compatibility: Upright Dimensions & Hole Spacing
The uprights are the vertical posts of the rack. They typically come in 2×2”, 2×3”, or 3×3” dimensions. The main reason this matters is that your accessories (J-Cups, safeties, etc.) must be compatible with your upright size.
Hole spacing and diameter also impact what attachments you can use. Most holes are either 1” or 5/8” in diameter. The key is to avoid vendors with highly customized or proprietary dimensions, as this locks you into their (often more expensive) ecosystem of accessories.
Safety & Usability: J-Cups & Safeties
J-Cups are the J-shaped hooks that hold your barbell. Good ones are lined with a protective plastic called UHMW to prevent damage to your bar. Safeties are the non-negotiable feature that will save you from injury on a failed lift. In a cage, these are typically long steel pins. On a half rack, they are external “spotter arms.” In either case, ensure they are sturdy and well-constructed.
Customizability: Must-Have Attachments
The most common and valuable attachment is a pull-up bar, which often connects the uprights and adds stability. My other top three recommendations are resistance bands (a cheap and versatile alternative to a lat pulldown machine), dip bars, and weight horns for storing your plates (which also adds stability to the rack).
Our top squat rack recommendations overall
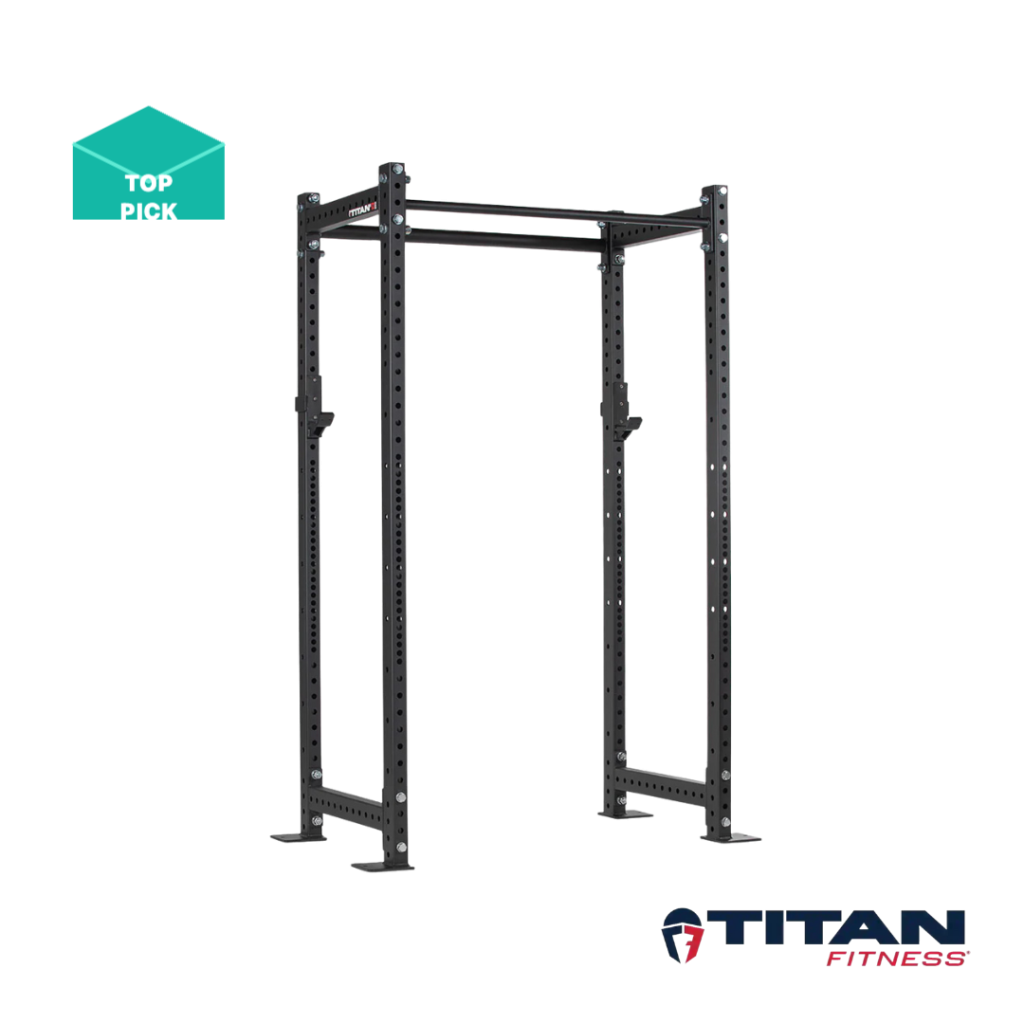
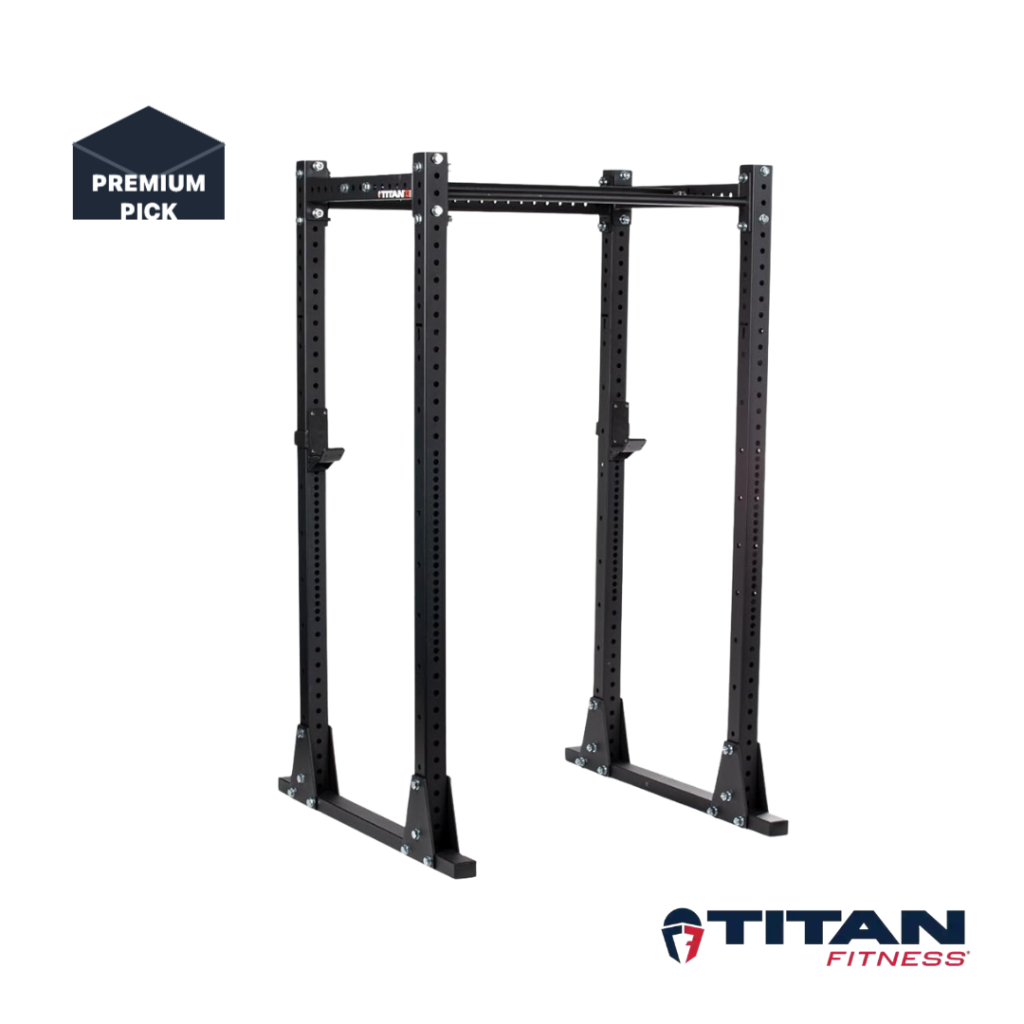
If you’re willing to bolt it down: the Titan T-3 is our favorite
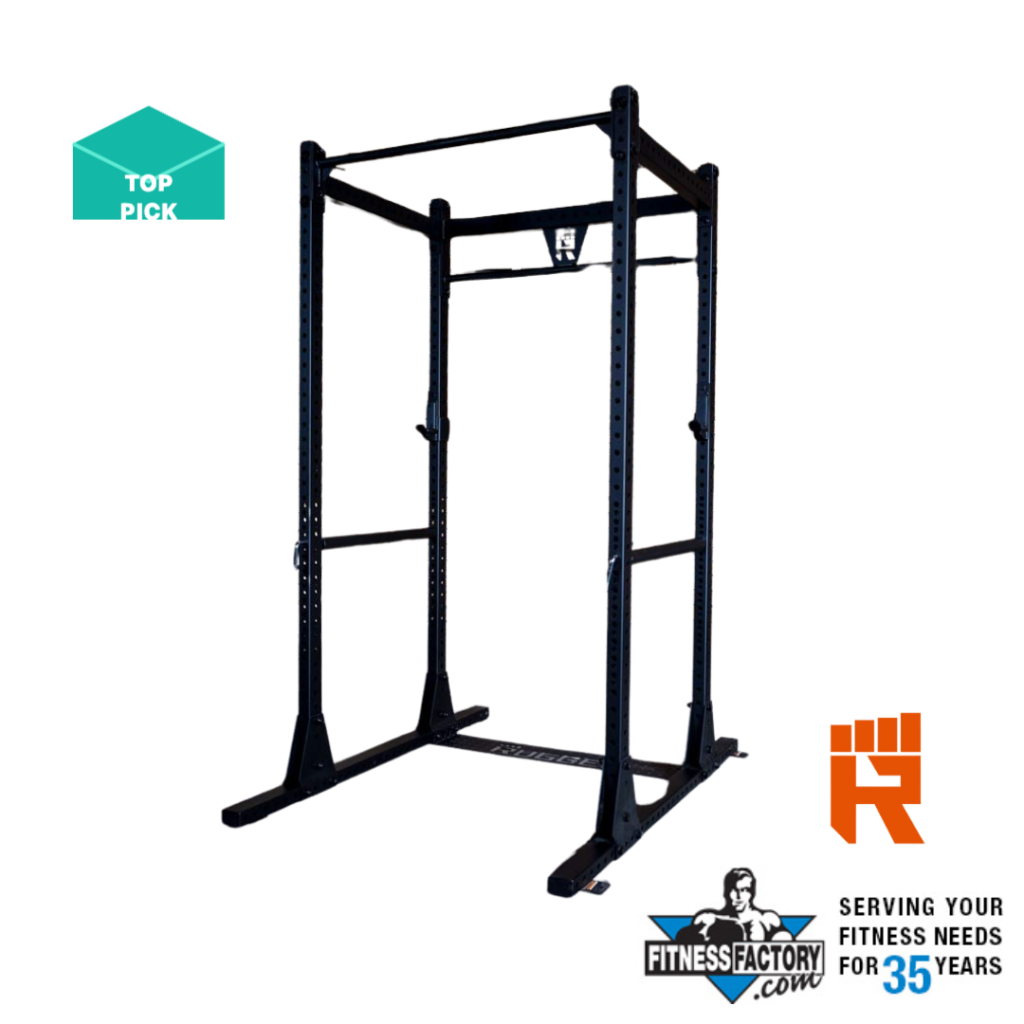
If bolting down is a NO-NO, then the Rugged Warrior is a winner
HGM take – “To Bolt Down, or Not Bolt Down?”: when we’re looking at the mid-range in terms of budget (c. $600) and footprint, we’ve got two clear favorite picks. In terms of specs, an astute reader will notice that they’re both 2×3 11 gauge cages, but that’s not truly why we’re picking them; after all, I’m willing to die on the hill of ‘2×2 and 14 gauge is truly enough for most people’. What we really like is that in addition to the thick steel and cross-accessory compatibility, you’re getting Westside spacing. The combination is that these racks are commercial grade in terms of stability; have pull-up bars built-in; and offer maximum customizability via accessories.
The Titan T-3 is a notorious and divisive product in the home gym community. It famously brought Rogue-level, heavy-duty features (like 11-gauge steel and Westside spacing) to a much more accessible price point; its uncanny design similarity to Rogue’s R3 made it the rack that Rogue customers love to hate. Brass tacks: for the serious lifter who wants a “buy it for life” rack without the premium price tag and is able to bolt it down, the T-3 is arguably the best deal on the market. And since this is very much the reality for most home gym buyers, we think this is the best pick for most people.
But, bolting down is not for everyone (in fact, on a personal level, I try to avoid bolting anything anywhere as much as I can – that’s a personal foible I readily admit to). The Rugged Warrior shares pretty much all of the T3’s virtues and specs, except it doesn’t need to be bolted down. Now, to be clear: Rugged is a less well-known brand than Titan. This might be off-putting for some (though as noted above, Titan’s brand itself can be off-putting to some). I still feel comfortable recommending Rugged because they exclusively use Fitness Factory – a well-established vendor and a long track record in customer service – as a distributor. The Rugged Warrior can often be on sale for $595, which we think is a killer price for what you get.
Okay, that’s the top pick: what does something a bit more Premium look like? Enter the X3.
This is another Titan – and we have several non-Titan recs below for more specific budget/space considerations. However, against most other racks, the Titan X-3 is like choosing between a Toyota and a Lexus. The Toyota Corolla will get the job done reliably for years. But the Lexus offers a superior level of build quality, more premium features, and a more satisfying user experience. It offers you more than you need (and you know it), but it’s a smart, high-value way to get a luxury-tier product without paying the full ‘German luxury’ price (which in our world would be the Made in USA racks). We love that it’s flat foot; the 30″ depth is fantastic because you can place the four weight holders on one of the uprights and the plates won’t get in the way of your lifting; and at 3×3 11 gauge, this thing is a tank.
To be clear, you can go even more premium. As stated previously, Titan picked up a bit of a reputation for putting out near-identical models to Rogue, at a Made in China price point. Rogue is the Made in USA premium choice. We recommend one of their racks below, but overall, I find it a little hard to ‘regularly recommend’ them due to price point. I’m fully supportive of a higher price point for the Made in USA value proposition – both the quality control, and the local employment that comes with it. The thing is, you’re not just paying for that. Their margins also account for their long-time sponsorship of the CrossFit games, etc. Brand equity needs to be monetized somehow…
Now, for the budget vs space picks…
Our Top Recommendations to Choose a Squat Rack based on Space and Budget
Here’s a simple framework to choose your squat rack based on the two most common constraints: space and budget.
1. If you have space but a tight budget: The Budget Cage
- The Logic: You get all the safety and versatility of a full cage at the most affordable price point. This is the best bang-for-your-buck for anyone with a dedicated garage or basement space. Look for a solid, 2×2″, 14-gauge power rack from a reputable budget-friendly brand.
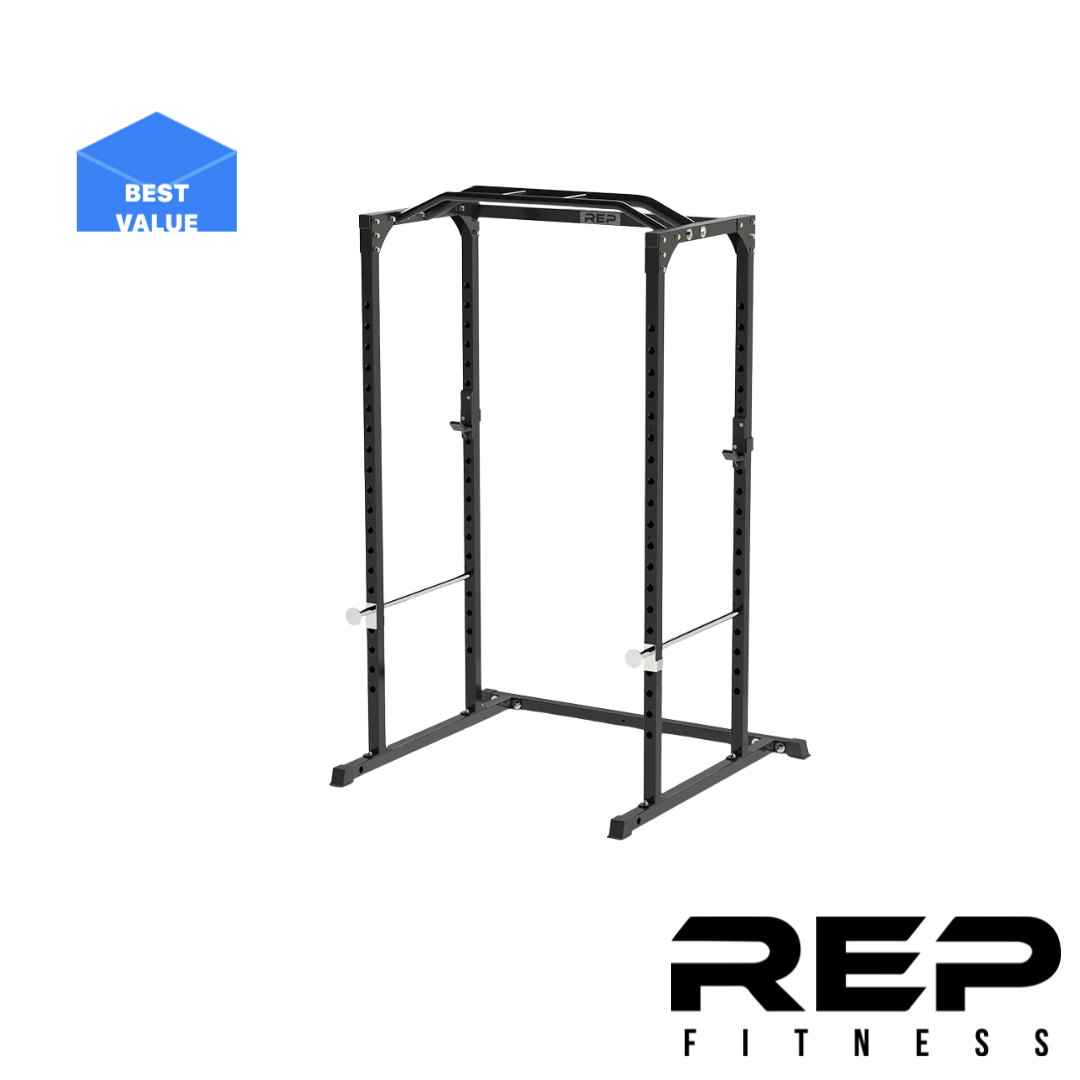
- REP PR 1100: Not the absolute cheapest in the category, but the best in the category: this delivers on every aspect you need. It can handle 700lbs, has a multigrip pullup bar, only about 2″ between holes (so, a lot of room for accessories), safety pins, and high quality J-Cups. At $379.99, there are slightly cheaper racks around, but REP’s reputation for quality is unmatched in this segment.
- Its fraternal twin, the REP PR 1000, is just as good a choice (and it’s what I got my dad, with a strong focus on safety). It has two built in weight storage horns, but that takes up a bit more floor space (which is why we recommended the 1100). Its pullup bar is standard instead of multigrip. Its biggest advantage is closer hole spacing, which means more flexibility for choosing at what height to place your J-Cups. But, if you have the budget, then getting it with the weight horn attachments is the smarter move.
- The cheaper alternative is the Fitness Reality 810XLT. It’s not as good as the Rep models, but it gets the job done for cheaper and with the same space requirements.
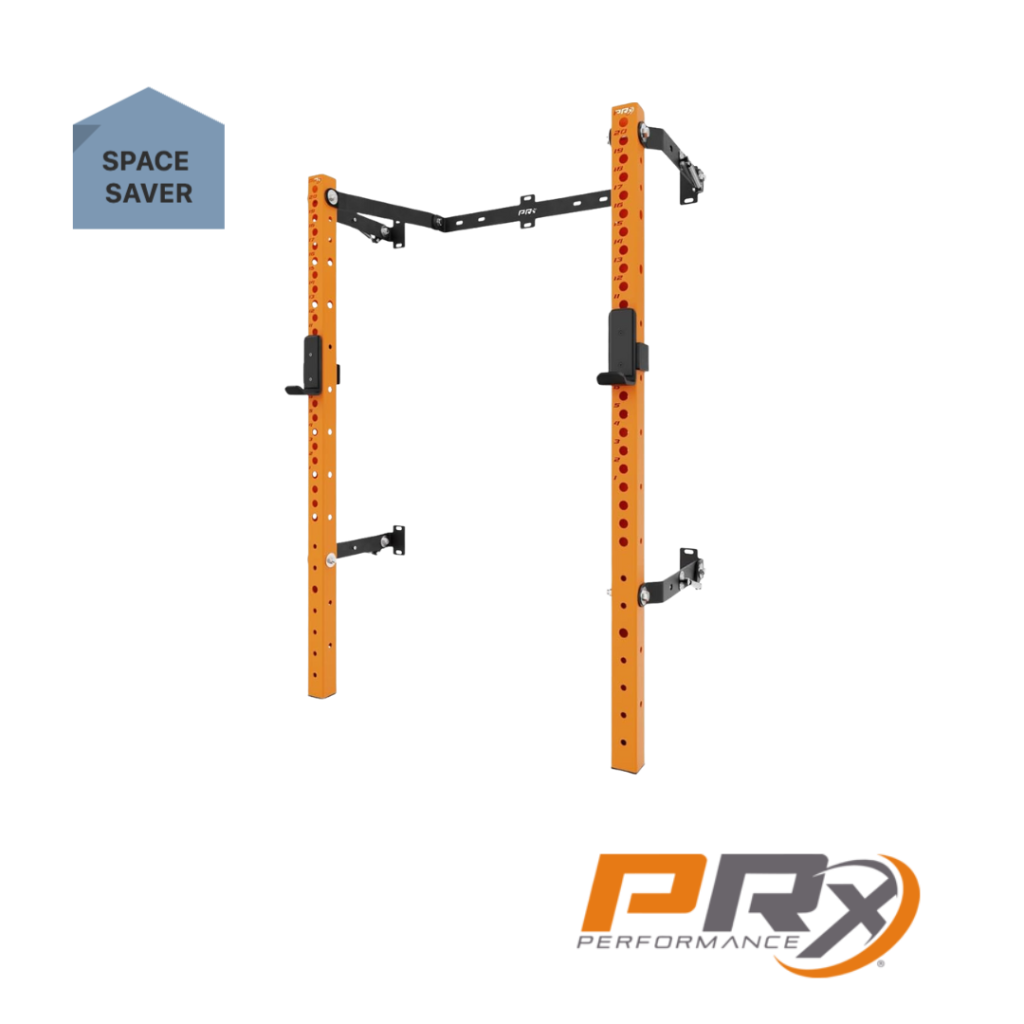
2. If you have the budget but not the space: The Premium Space-Saver
- The Logic: When space is your absolute biggest constraint, you need smart engineering. A high-quality, wall-mounted folding rack is the ultimate solution, allowing you to have a full-strength power rack that virtually disappears when you’re done training.
- PRx Performance Pro Folding Rack: The PRx Performance Pro Folding Rack is the undisputed king of this category. Famous for its appearance on Shark Tank, PRx patented a vertical folding system that is simply brilliant. Made with heavy-duty 11-gauge steel, it’s a no-compromise rack that you can fold up against the wall in seconds. For those training in a tight garage who still need to park a car, the PRx isn’t just a good option—it’s the only option.
- I always advocate spotter arms, for safety. PRx’s are a little pricey, but these here are an affordable alternative.
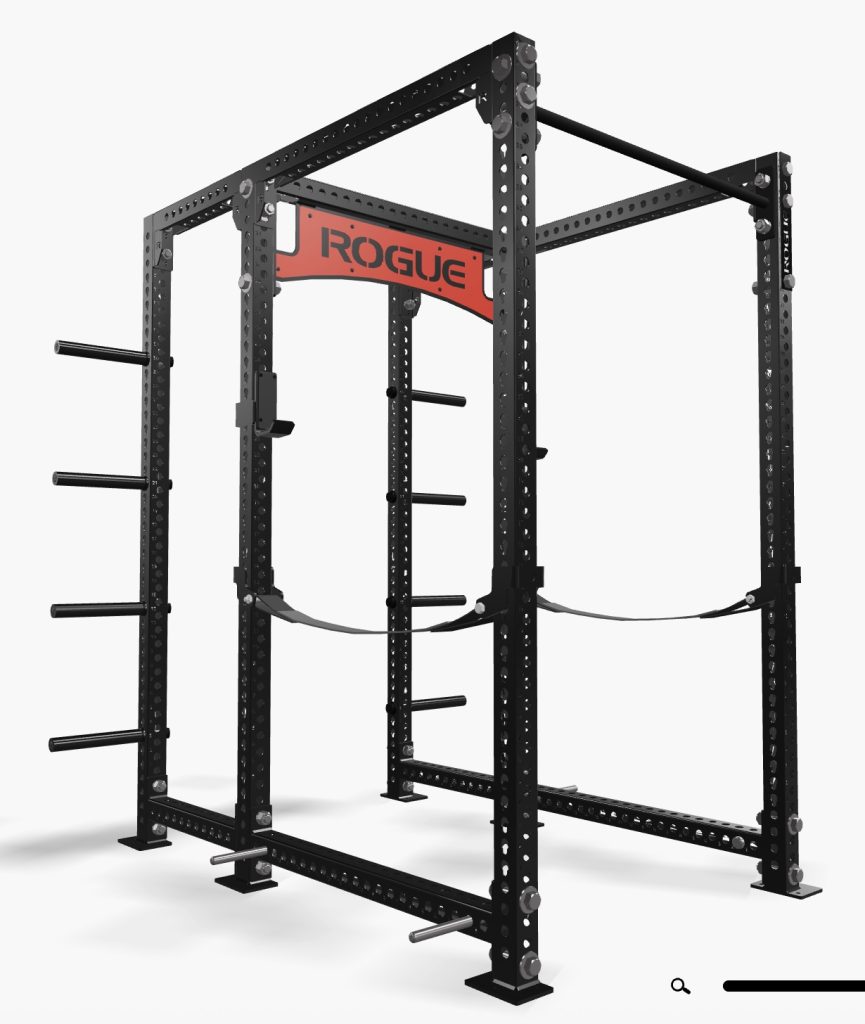
3. If you have both budget and space: The “Forever” Rack
- The Logic: This is the no-compromises option. You get maximum safety, stability, and a lifetime of customizability with a huge ecosystem of available attachments. Look for a premium, 11-gauge, 3×3″ power rack from a top-tier brand.
- The Rogue RM6 Monster Rack 2.0 (a mouthful) is, as its name suggests, a SIX (yes, 6) upright monster: the basic version starts at $2,855, but with six uprights that must be bolted into the ground, this is a statement that your home gym will outlast us all. Plate storage is built into the third pair of uprights, and it feels cavernous inside the rack. It uses safety straps instead of pins, which is considered premium for ease of height selection as well as not being noisy. Holes are on all four sides of the uprights, allowing for unparalleled attachments. And, as far as we know, it simply HAS NO WEIGHT LIMIT.
- The RM6 is probably the dream for most deep-pocketed home gym owners, but the prize to the most overbuilt, bomb-proof, made in USA rack in the big ticket category is the EliteFTS Collegiate Power Rack.
4. If you are limited in both budget and space: The Compact Starter Rack
- The Logic: This is the most pragmatic starting point to train safely with a barbell when both space and funds are tight. Look for a budget-friendly half rack with spotter arms, or a pair of high-quality independent squat stands that include reliable safety features.
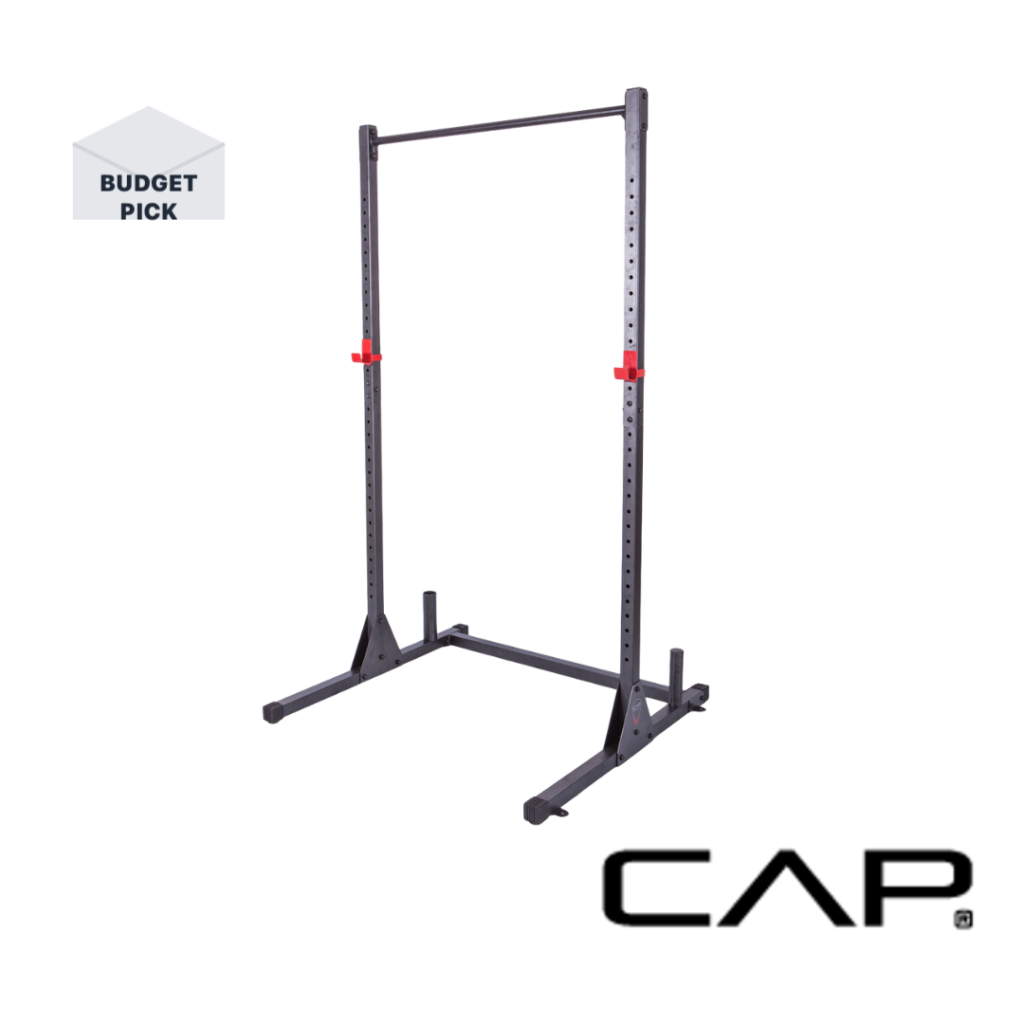
- CAP Barbell CS7000F – the name is unpronounceable, but this is the famous $99 squat rack. Footprint for racks rarely gets smaller than four square feet, but it pretty much NEVER gets cheaper than this item. There’s a trade-off, of course. The headline number is that the weight rating is 300lbs, which many of you will outgrow if you train assiduously enough.
- It also doesn’t come with spotter arms, and CAP’s holes are such that you need to buy theirs. Which, admittedly, could be worse: at 16″, it just barely meets our standards, and can usually be had for around $25. In its favor is that you can store the bar upright and there’s also a single weight horn in the back, which doubles for plate storage and stability when doing pullups (yes, it has a pullup bar). Its worst features are not readily obvious. First, the uprights are actually not one piece, but two, meaning you have to bolt them together. Second is that the J-Cups are also low quality; they don’t even HAVE lining. Still, no other product offers this many features at this price point, which keeps customers coming back time and again.
Conclusion: four ways to choose a squat rack as command center for your home gym
Choosing the command center for your home gym doesn’t have to be a minefield. Start by measuring your space, then decide which type of rack best fits your needs—always defaulting to a cage if you can. From there, focus on quality safety features and sturdy construction. Get those priorities straight, and you’ll choose a squat rack that will serve you safely for a lifetime of lifting.
Now that you’ve chosen your rack, see how it all comes together in our Ultimate Starter Home Gym Guide.